

Why Is My Drone Gimbal Not Level? Causes and Fixes
Quick answer: If your drone gimbal is not level, begin with the simple checks: remove the gimbal cover, place the aircraft on a hard level surface, inspect the camera for debris or impact damage, and watch the full startup self-check. If the movement is smooth but the horizon stays slightly tilted, run automatic gimbal calibration and then use only a small horizon or roll adjustment if your model provides one.
If the gimbal clicks, sticks, shakes, stops during calibration, or became crooked after a crash, do not twist the camera by hand. Power the drone off and contact support because a motor, damping mount, bracket, or ribbon cable may be damaged.
A tilted camera does not always mean the gimbal is broken. A sloped launch surface, a misleading live-view preview, strong crosswind, an aggressive turn, or a temporary movement-limit response can make the horizon look wrong. The pattern matters: a fixed tilt that remains on the same side in calm flight is different from a brief tilt that corrects itself when the drone slows down.
How Do You Confirm That a Drone Gimbal Is Not Level?
Do not judge the gimbal from the aircraft sitting powered off. When the drone is off, the gimbal motors are not actively holding the camera, so the camera may hang to one side under its own weight. Judge it after startup, after the self-check has finished, and from an original recorded file whenever possible.
Use a real reference in the scene. A distant horizon is helpful, but the straight roofline and vertical corners of a building can be easier to compare with an on-screen grid. Keep the camera facing forward, hover steadily in calm air, and record a short clip. Then turn the aircraft around and repeat the test. If the frame remains tilted to the same side in both directions, the gimbal or its level reference needs attention. If the tilt changes with wind direction or disappears when the drone slows, it may be flight behavior rather than a fixed alignment error.
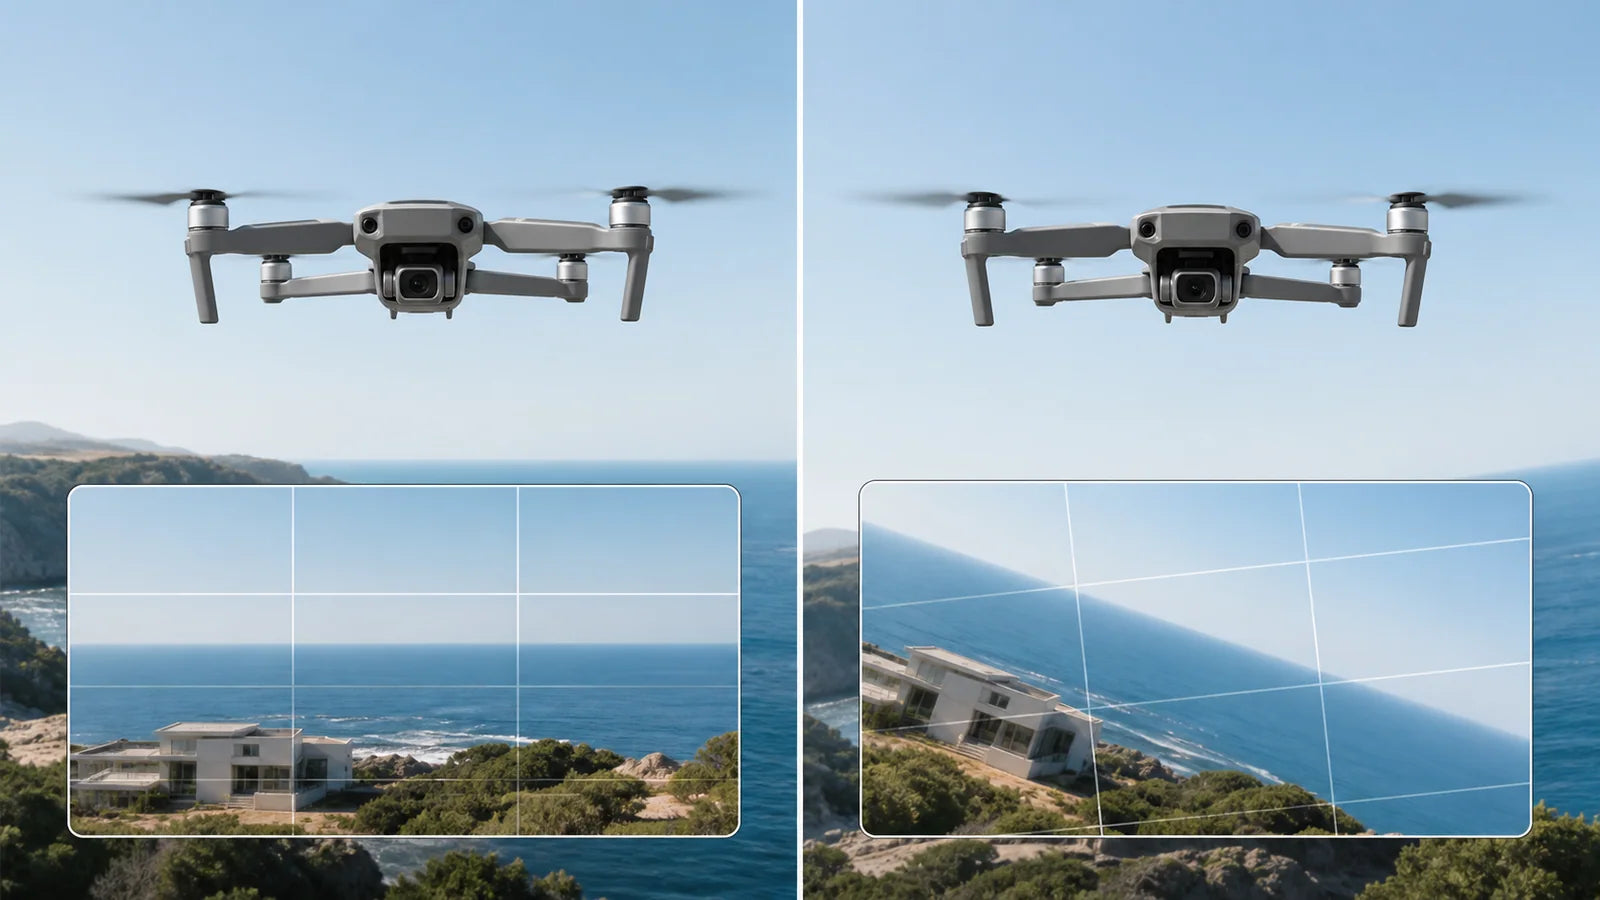
Use the original recording, not only the controller preview
The controller screen or phone preview can be compressed, delayed, or briefly skewed by the way the live view is displayed. Record a short clip to the aircraft-side storage card when the model supports it, and review that original file after landing. If the preview looks tilted but the original file is level, the gimbal is probably not the source of the problem. The drone SD card guide explains where original and controller-side files may be stored.
If the original file is level but looks soft, shaky, or smeared, use the separate drone camera blurry checklist. Horizon alignment and image sharpness are related to the camera system, but they are not the same fault.
Why Is My Drone Gimbal Not Level?
The most common causes fall into four groups: an incorrect test setup, a small calibration or horizon-offset error, temporary flight movement, or physical gimbal damage. Start with what you can see and reproduce before changing settings.
| What you see | Likely cause | First check | Best next step |
|---|---|---|---|
| Horizon is always tilted to the same side | Gimbal calibration or horizon offset; surface was not level; impact-related misalignment | Repeat a calm hover test over a verified level surface | Auto-calibrate, then apply only a small permitted horizon adjustment |
| Camera is crooked before the drone is powered on | Gimbal motors are inactive | Remove the cover and watch the powered startup self-check | No repair is needed if the camera centers normally after startup |
| Tilt appears briefly during a hard turn, braking, or a gust | Aircraft attitude or gimbal movement-limit protection | Test a gentle hover and slow movement in calmer air | Fly more smoothly; do not use a large permanent offset for a temporary event |
| Gimbal clicks, buzzes, shakes, or cannot finish self-check | Cover attached, debris, binding axis, damaged motor, mount, or cable | Power off and inspect without moving the camera by force | Remove a safe visible obstruction or contact support |
| Tilt began immediately after a crash or hard landing | Displaced damper, bent bracket, strained ribbon cable, motor or axis damage | Inspect the gimbal and aircraft body before calibration | Do not fly if noise, sticking, damage, or calibration failure remains |
| Aircraft itself leans or drifts as well as the camera | Flight attitude, propeller, IMU, motor, controller, or wind issue | Check the full aircraft, not only the gimbal | Use the drone drift troubleshooting guide |
What Should You Check Before Calibrating the Gimbal?
A gimbal calibration should begin only after the camera can move freely. It cannot repair a bent part, and it cannot complete correctly if a cover, cable, grain of sand, or displaced mount restricts an axis.
- Power the drone off. Stop the motors and remove the battery if the model instructions require it before inspection.
- Remove the gimbal cover or transport lock. A cover left in place is a common reason for a blocked startup self-check.
- Look for debris. Check for dry grass, dust, sand, packing foam, hair, or an accessory touching the camera or gimbal arm. Use a blower or soft brush only where the material is loose and clearly accessible.
- Inspect impact points. Look for scuffs, a bent bracket, uneven gaps, a damper pulled out of position, or a ribbon cable that looks pinched, stretched, or torn.
- Check the launch surface. A table, car hood, soft bag, sloped patio, or uneven ground may look flat while giving the aircraft a tilted starting reference. Use a hard surface that you have verified is level.
- Watch the startup self-check. Power on without touching the aircraft. The camera should move through its startup sequence smoothly, then settle without repeated clicking, buzzing, shaking, or binding.
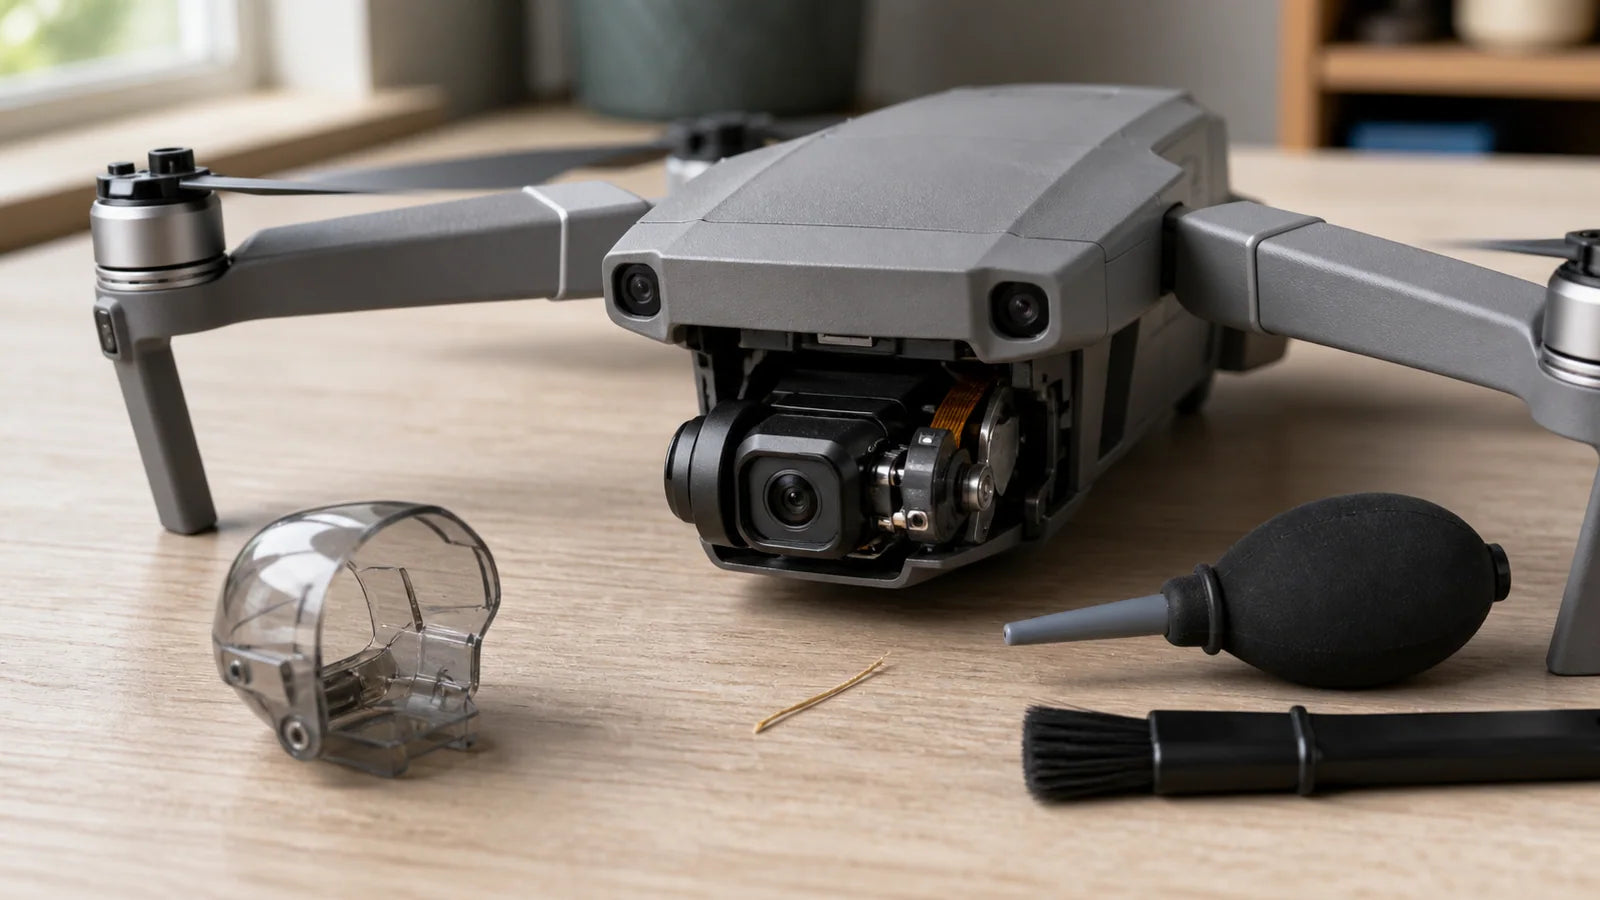
Do not straighten the gimbal by hand. The camera may move loosely when powered off, but that does not authorize forcing it through an axis. Twisting or pulling the camera can overload the motor, damage the ribbon cable, or turn a small alignment issue into a hardware repair.
How Do You Fix a Drone Gimbal That Is Not Level?
Use the least invasive fix first. Test again after each step so you know what changed. Menu names vary by TODAMU model, so follow the controller or manual wording for your aircraft rather than searching for an identical button on another model.
- Restart on a verified level surface. Remove the gimbal cover, keep the aircraft still, power on, and let the complete gimbal self-check finish.
- Reset any existing horizon offset. If a previous roll or horizontal fine adjustment is far from its default value, return it toward the normal center before evaluating the gimbal.
- Run automatic gimbal calibration. Keep the drone stationary and do not touch the camera or table while the progress is running.
- Restart the aircraft. Give the gimbal a fresh startup cycle after calibration.
- Test in calm air. Hover low and close in an open location, record the original file, and compare the horizon in two opposite directions.
- Use a small fine adjustment only if needed. If movement is smooth and the remaining tilt is slight and fixed, make a small roll or horizon correction, then test again.
- Stop if the fault is mechanical. Clicking, sticking, shaking, a physically crooked bracket, repeat calibration failure, or post-crash damage requires support rather than more adjustment.
For the full distinction between aircraft sensors, compass heading, and camera alignment, follow how to calibrate a drone. That guide covers IMU, compass, and gimbal calibration as separate procedures.
Should You Use Automatic Calibration or Gimbal Fine Adjustment?
Automatic calibration comes first. It lets the gimbal controller check the movement range and establish its working center while the aircraft is stationary. A horizontal or roll fine adjustment is for a small residual error after the mechanism moves normally and automatic calibration finishes successfully.
Do not use a large fine-adjustment value to compensate for an obviously crooked camera. A large offset can hide the symptom in one direction while reducing usable movement in another. It also delays the correct diagnosis when the real cause is an obstruction, displaced mount, bent part, or damaged motor.
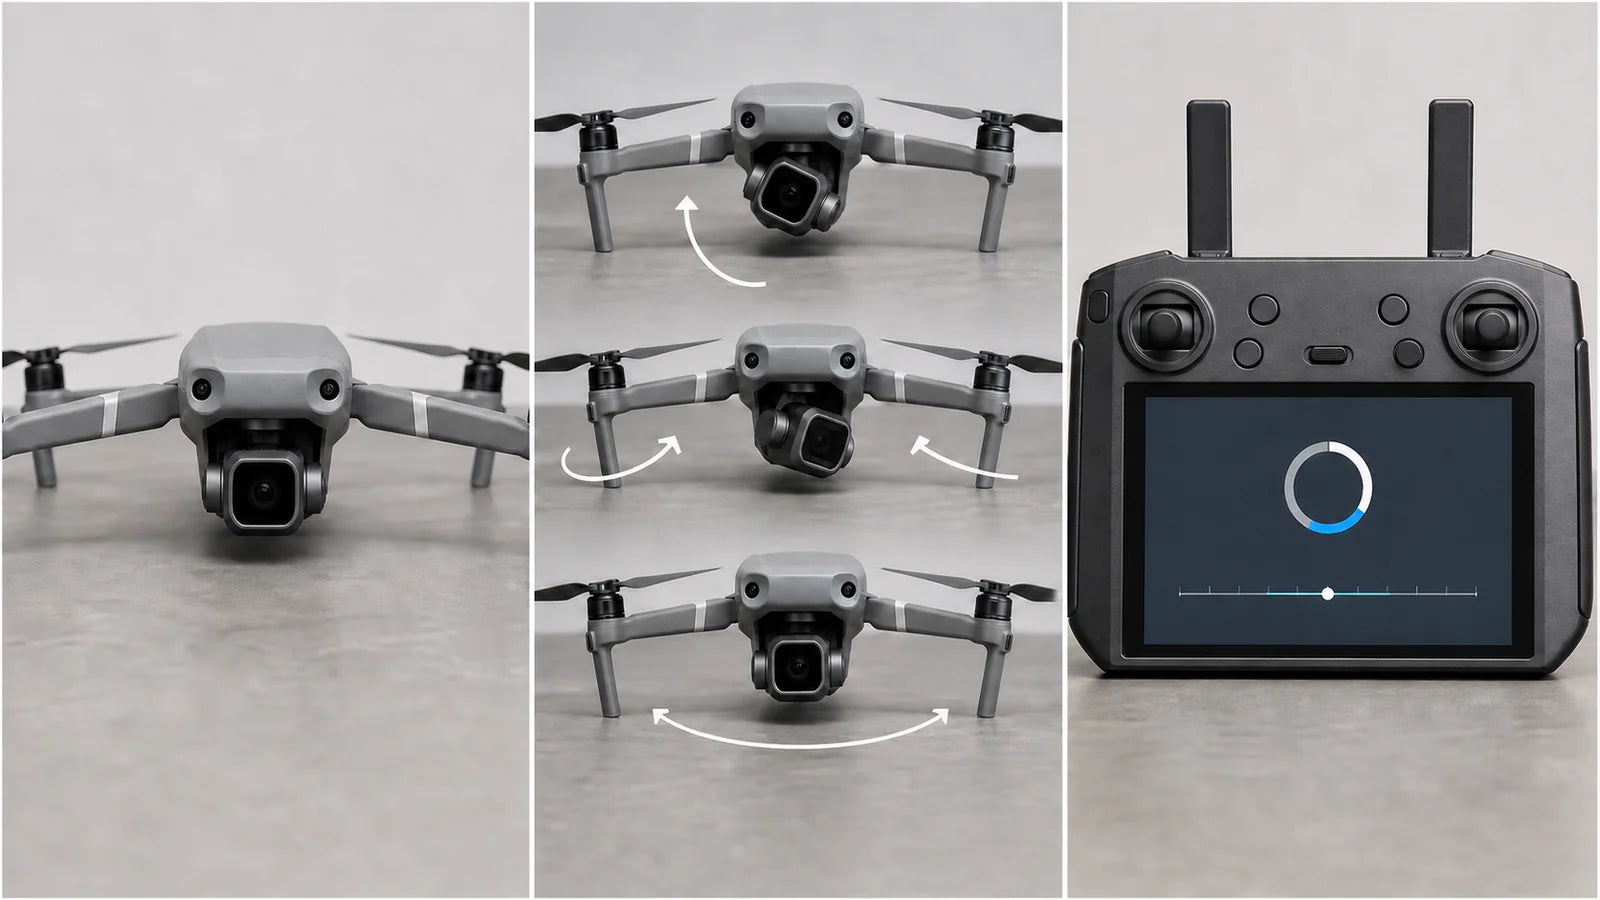
Does a tilted horizon mean the IMU must be calibrated?
Not automatically. The gimbal controls camera alignment, while the IMU helps the flight controller estimate aircraft attitude and motion. If the drone flies and hovers normally but the recorded horizon is consistently tilted, begin with gimbal inspection and gimbal calibration. Consider the IMU branch when the aircraft also reports that it is not level, leans or drifts abnormally, displays an IMU warning, or the model procedure specifically calls for it.
Compass calibration is not a horizon-level control. The compass supports heading, so repeatedly rotating the drone indoors or near metal is not the first fix for a crooked camera. Use the calibration requested by the actual symptom.
Simple rule: camera horizon wrong but flight attitude normal → inspect and calibrate the gimbal. Aircraft attitude wrong as well → inspect the whole aircraft and follow the model-specific IMU procedure. Heading or magnetic warning → move away from interference and use the compass procedure only when required.
Why Does the Gimbal Tilt During Wind, Turns, or Braking?
A drone has to lean into a crosswind to hold position. During a fast turn or sudden braking, its body may also use a larger attitude angle. The gimbal compensates within its mechanical range, but when the aircraft approaches that range, the camera may briefly follow part of the body movement. If the horizon returns as soon as the gust passes or the drone slows, that brief response can be normal.
Repeat the test in calmer air and use slower stick inputs. The National Weather Service Beaufort wind scale gives visible clues such as moving leaves, branches, flags, and trees when you do not have an anemometer. The model’s stated wind limit still takes priority, and a troubleshooting hover should use a conservative margin rather than the maximum.
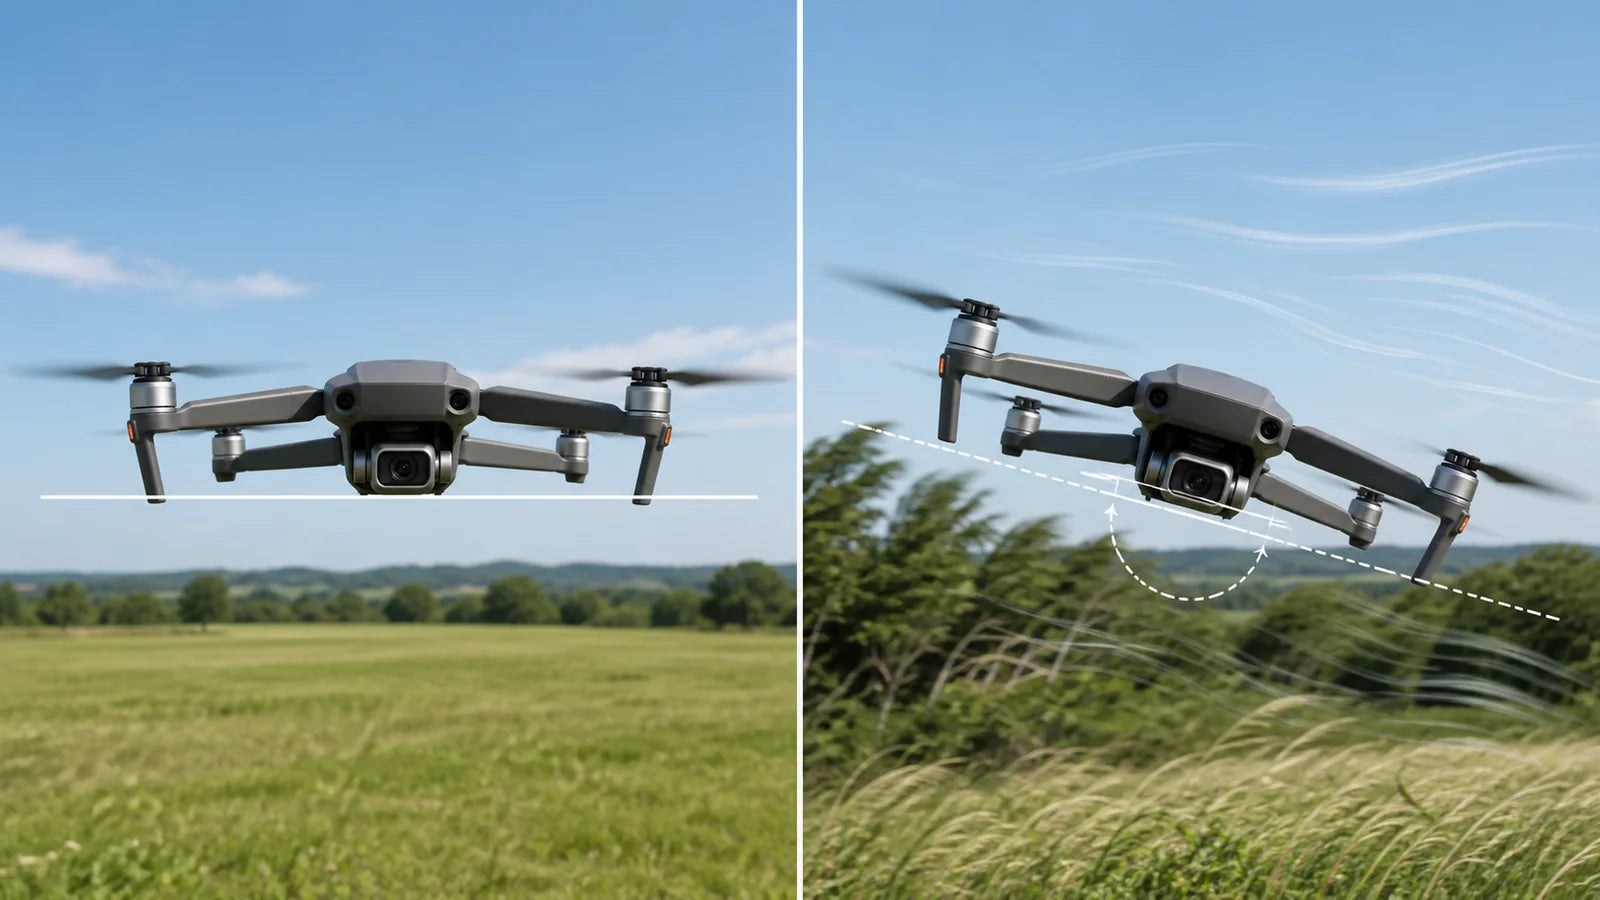
Do not fine-tune the gimbal while the drone is being pushed hard by wind. You may create a permanent offset to correct a temporary flight condition. Land, move to a calmer location, restart, and evaluate the original recording again.
When Is a Gimbal That Is Not Level a Hardware Problem?
Suspect hardware when the problem began after a crash, hard landing, transport impact, or gimbal obstruction. Calibration can correct a reference error, but it cannot reconnect a torn cable, reseat a damaged motor, straighten a bent bracket, or restore a broken damping mount.
Stop troubleshooting and contact support when you find any of these signs:
- The gimbal makes repeated clicking, grinding, buzzing, or scraping sounds.
- The startup self-check pauses at one point, repeats continuously, or cannot center the camera.
- The camera shakes while the aircraft is still on a firm surface.
- A rubber damping mount is pulled out, torn, or sitting unevenly.
- The ribbon cable appears pinched, stretched, creased, partly disconnected, or torn.
- An axis has a visibly abnormal gap or the camera sits at a strong angle after power-on.
- Automatic calibration repeatedly stops or reports failure.
- The horizon becomes more tilted during the same calm hover test.
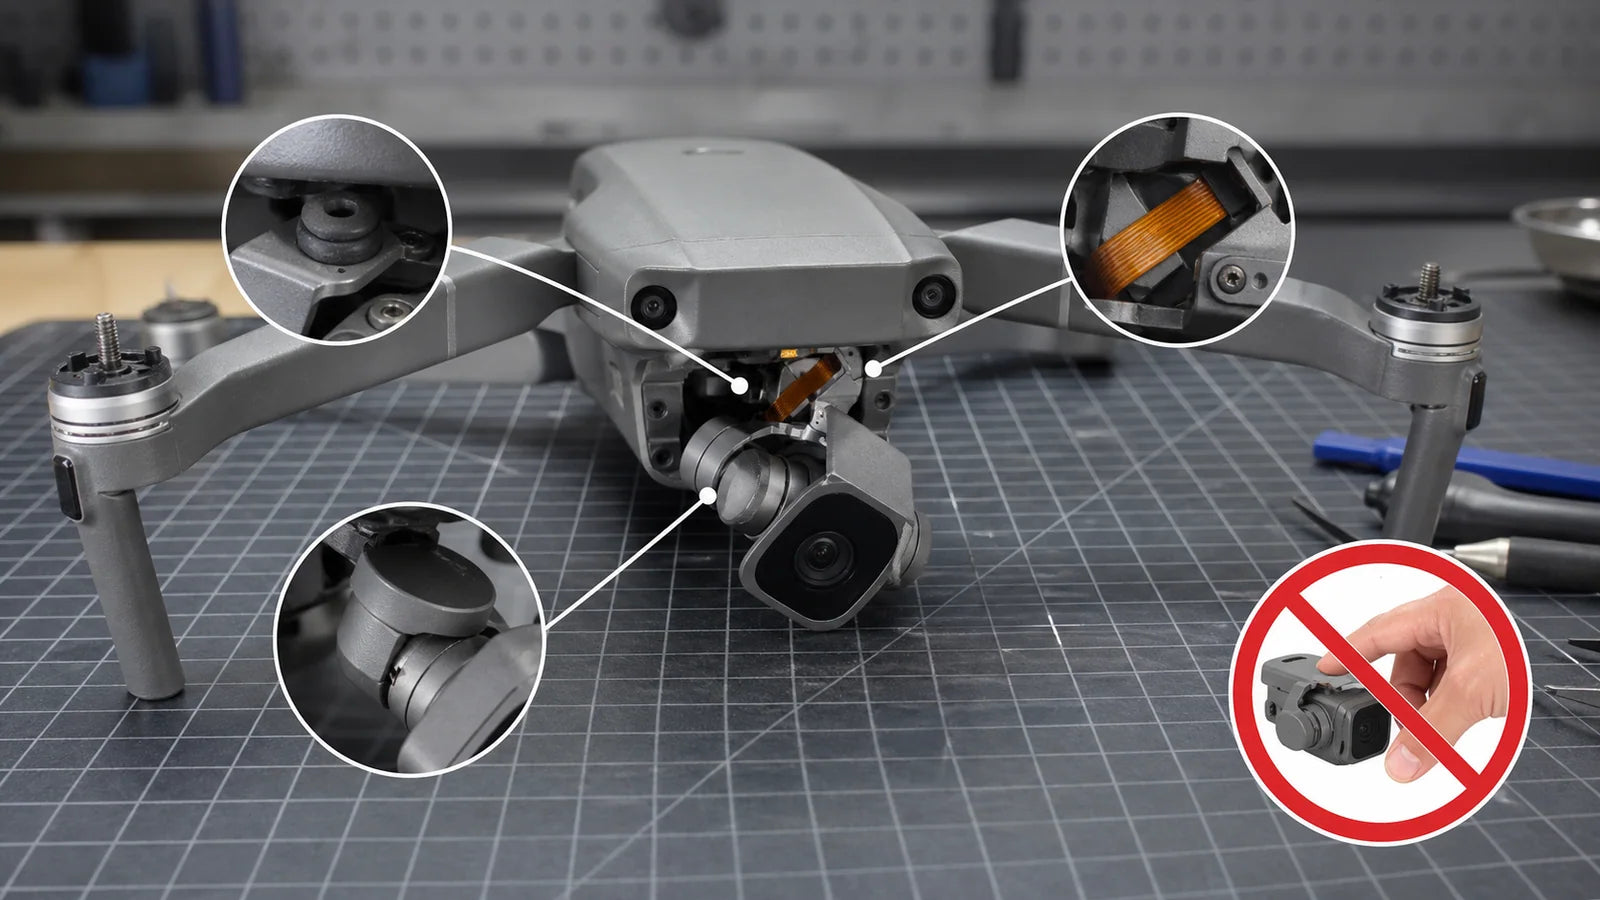
Do not fly to “see if it fixes itself.” A damaged gimbal can affect the camera, but an impact may also have damaged propellers, arms, motors, sensors, or the battery lock. Inspect the full aircraft before another takeoff.
Can You Fix a Tilted Drone Horizon in Editing?
You can often salvage an otherwise good photo or video by rotating and cropping it. This is useful for a one-time gust, a shot you cannot repeat, or a small residual angle. Adobe’s official guide shows how to straighten a horizon with crop and angle tools.
Editing is not a repair. Rotation removes part of the image near the corners, and a changing horizon may need keyframed correction that reduces usable framing even more. If every new clip is tilted, fix the aircraft-side cause before the next flight.
How Can You Prevent Drone Gimbal Alignment Problems?
- Remove the gimbal cover before powering on the aircraft.
- Reinstall the cover only after the drone is powered off and the camera has stopped moving.
- Use a protective case that does not press against the camera or gimbal arms.
- Keep sand, dust, grass, moisture, and loose straps away from the mechanism.
- Start the drone on a hard level surface and let the startup check finish.
- Avoid fast manual camera movement, abrupt braking, and unnecessary maximum-speed filming.
- Inspect the aircraft after every hard landing or impact before trying calibration.
- Use the original aircraft-side recording when evaluating horizon quality.
If you are still learning the camera workflow, the drone camera beginner guide covers live view, recording, camera angle, and preflight checks. To understand what the three gimbal axes do, read what a 3-axis gimbal does on a drone or compare a 3-axis gimbal with EIS.
TODAMU model support: If the gimbal still tilts after a correct calm-air test and one automatic calibration, use the TODAMU contact page. Include the exact model, whether the problem followed a crash, a short startup video with sound, a screenshot of the horizon, and the point where calibration stops.
If your current gimbal is operating normally and you are comparing stabilization for future filming, browse TODAMU drones with 3-axis gimbal. The WindForce X is the larger long-range screen-controller option, while the WindForce Mini is the more compact 3-axis-gimbal option.
Frequently Asked Questions
Why is my drone gimbal not balancing?
A drone gimbal may not balance because its cover is still attached, debris blocks an axis, the aircraft started on a tilted surface, a horizon offset is incorrect, or a mount, motor, bracket, or cable was damaged. Check the powered startup self-test before judging the unpowered camera position.
How do I fix a drone gimbal that is not level?
Remove the cover, inspect for obstruction or damage, restart the drone on a verified level surface, run automatic gimbal calibration, and test the original recording in calm hover. Use only a small horizon adjustment if the gimbal moves smoothly and a slight fixed tilt remains.
How do I reset or calibrate a drone gimbal?
Place the drone on a hard level surface with the gimbal cover removed, power on, wait for the self-check, open the model’s gimbal settings, and run automatic calibration without touching the aircraft. Restart and perform a calm low-hover test afterward.
Why is my gimbal level on the ground but tilted in flight?
Wind, fast sideways flight, aggressive turns, and hard braking can make the aircraft bank until the gimbal approaches a movement limit. Test with slow inputs in calm air. If the tilt remains fixed on the same side, inspect and calibrate the gimbal.
Can strong wind make a drone horizon tilt?
Yes. The aircraft may lean into a crosswind to hold position, and the gimbal may briefly follow some body movement near its mechanical limit. A temporary tilt that corrects itself is different from a persistent alignment error.
Should I move a drone gimbal by hand?
No. Do not twist, pull, or force the camera level. Manual force can damage the motor, axis, damping parts, or ribbon cable. Power off and inspect visually; contact support if the mechanism is stuck or physically crooked.
Why does the drone horizon drift during a long flight?
Changing wind, temperature, repeated turns, movement-limit events, or an unstable horizon offset can make the angle change. Record a calm hover at the beginning and end of the flight. A growing repeatable tilt after calibration may need support inspection.
Do I need IMU calibration when the gimbal is not level?
Not always. Start with the gimbal if flight attitude is normal and only the camera horizon is wrong. Follow the IMU procedure if the aircraft also reports a level or attitude error, leans or drifts abnormally, or the model specifically requests IMU calibration.
Why is my drone gimbal not level after a crash?
A crash can displace a damping mount, bend a bracket, strain the ribbon cable, or damage a motor or axis. Inspect before calibration. If there is noise, sticking, visible damage, or repeated calibration failure, do not fly or force the camera.
Can editing fix shaky gimbal footage or a tilted horizon?
Editing can rotate and crop a tilted shot and may stabilize mild movement, but it cannot repair a damaged gimbal. A changing angle also costs more image area to correct. Fix a recurring aircraft-side problem before recording new footage.
Why is my TODAMU drone gimbal not level?
Check the cover, launch surface, startup self-check, obstruction, wind, horizon setting, and crash history. Then run the exact model’s automatic gimbal calibration once. If the issue remains, send TODAMU support the model name, startup video, horizon sample, and calibration result.
Bottom line: A slight fixed horizon error can often be corrected with a clean startup, automatic gimbal calibration, and a small permitted fine adjustment. A gimbal that clicks, binds, shakes, fails calibration, or became crooked after impact needs physical inspection, not more force or a larger offset.